
Hosted Checkout
Take payments on Ozow's Hosted Checkout with One API. Create a payment request, redirect the customer to it, and confirm the result from the webhook.
On this page15 sections
- Before you start
- Environments
- How redirect works
- Core integration
- Step 1: Set up your Client ID and Client Secret
- Step 2: Obtain an access token
- Step 3: Create a payment request
- Step 4: Redirect the customer
- Step 5: Handle the webhook notification
- Step 6: Confirm the transaction outcome
- Step 7: Cancel a payment
- Optional features
- Standalone button
- Customer Identity Verification
- Next steps
Build with AI 2 packages
A build package is every page for one task, with the API operations they use. Copy the prompt into a coding assistant, or hand it the package itself: slim links to each page, full inlines all of them in one document.
- Take a paymentEverything needed to take a payment end to end with One API, from credentials through the hosted page to the webhook that confirms it, and the test cases that prove each outcome before you go live.
- Migrate a payin from the Payments API to One APIEverything needed to move an existing Hosted Checkout payin onto One API, with the deprecated guide and its One API counterpart side by side.
This guide walks you through a Hosted Checkout integration using One API. Your system creates a payment request, redirects the customer to Ozow's secure Hosted Checkout, and receives a webhookWebhook A URL of yours that Ozow calls when something happens, rather than you polling to find out. The call carries no credential of yours and arrives at a public URL, so authenticate it before acting on it: a hash field on the Payments API, a Svix signature on One API. notification when the payment is complete.
This guide uses One API: Ozow's recommended API for all new integrations. It uses OAuth 2.0OAuth 2.0 The authorisation framework behind the token endpoint. Ozow uses the client credentials flow: your server exchanges a client ID and secret for a short-lived access token, and sends that token rather than the secret on every subsequent call.RFC 6749 for authentication, and new payment methods and features are released here first.
Already integrated? If your integration posts to api.ozow.com and builds a SHA512SHA-512 A hashing algorithm. Ozow uses it to sign the values in a request or a notification so you can tell that they arrived unaltered and came from us. Hashing is one-way: the hash cannot be turned back into what produced it.Wikipedia hash, you're
on the Payments API: see Hosted Checkout under
Deprecated, or Migrating to One API.
Before you start
- You have completed Prerequisites and onboarding
- You have access to One API clients in the Ozow Portal. If you don't have access, contact support@ozow.com or your account manager
- You have your site codeSite code The unique code for a site registered under a merchant. A site is a place to transact: a website, or a branch of a store. A merchant can have several, and each transaction names the one it belongs to, so sending the wrong code files the payment against the wrong place., in the format
XXX-XXX-XXX. See Find your site code if you're not sure where to find it
Environments
| Environment | Token endpoint | API base URL | Portal |
|---|---|---|---|
| Production | https:/ |
https:/ |
dash.ozow.com |
| Staging | https:/ |
https:/ |
stagingdash.ozow.com |
How redirect works
Core integration
Step 1: Set up your Client ID and Client Secret
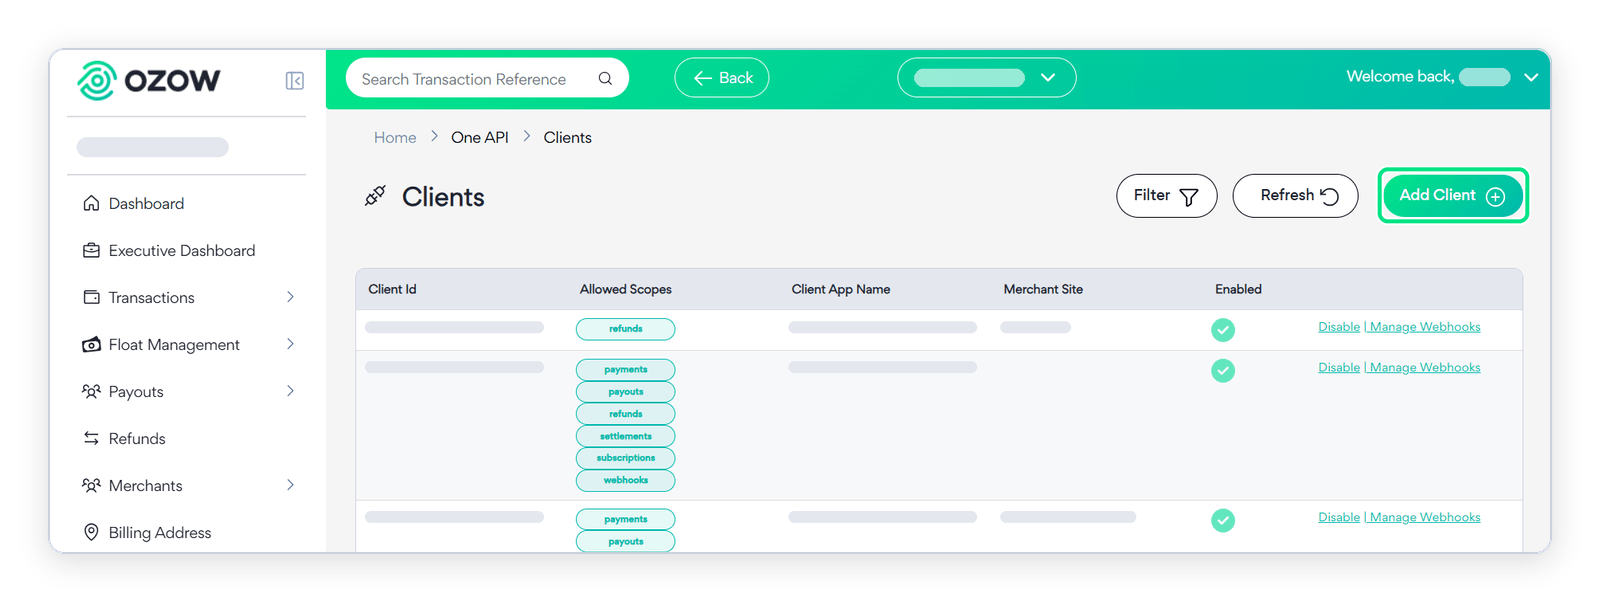
1. Open One API Clients: In the side menu, select One API, then Clients. You'll see a list of your existing API clients.

2. Add a new client: Click Add Client at the top right of the Clients page.
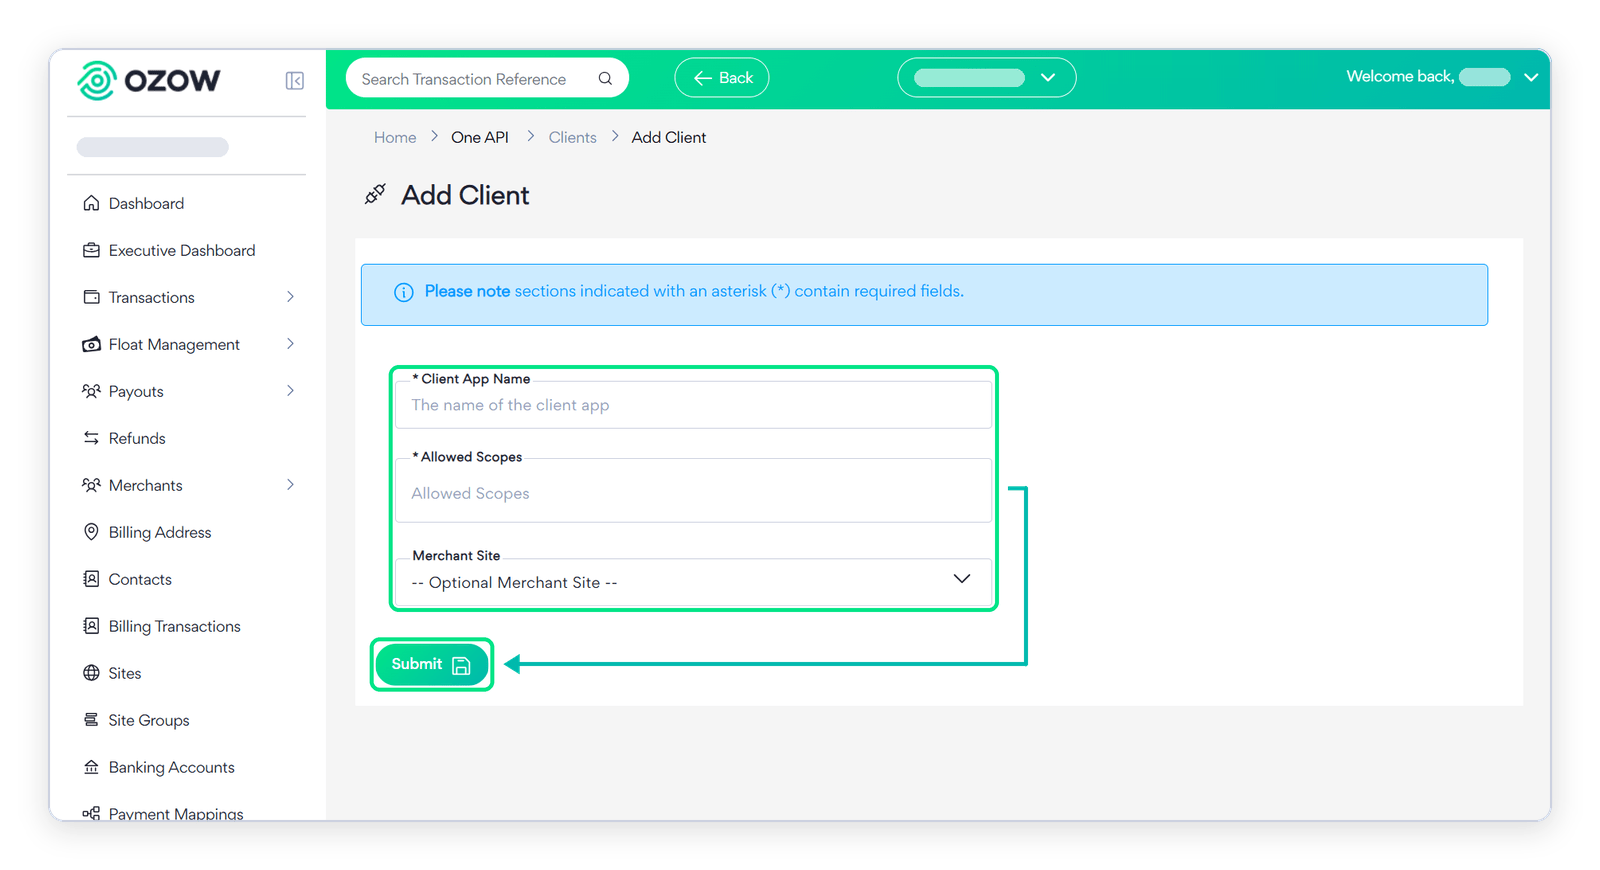
3. Enter the client details: Complete the form and click Submit.
- Client App Name: a name that helps you recognise the integration later, for example "Karoo Coffee Co. production".
- Allowed Scopes: choose only the scopes your integration needs, for example payments or refunds. For more information see the scope table below.
- Merchant Site (optional): limit the client to one site. Leave it blank to use the client across your merchant account.
| Scope | What it lets your client do | Operations |
|---|---|---|
payments |
Look up payment methods and regions, verify bank accounts, create, read and cancel payment requests, run transactions and resend their notifications | GET /, GET /, POST /, /, / (except refunds) |
refunds |
Request, read and cancel refunds, and read or resend refund notifications | /, GET and POST / |
settlements |
Read settlementsSettlement Ozow paying the money you have collected into your bank account. Payins arrive at Ozow first and are settled to you on a schedule, so what a customer paid you today and what has been settled to you today are different amounts. and their line items | GET /, GET /, GET / |
subscriptions |
Create, read and cancel recurring payment subscriptions, and create and list their transactions | / |
webhooks |
Create, read, update and delete webhook messages and read the signing secret | / |
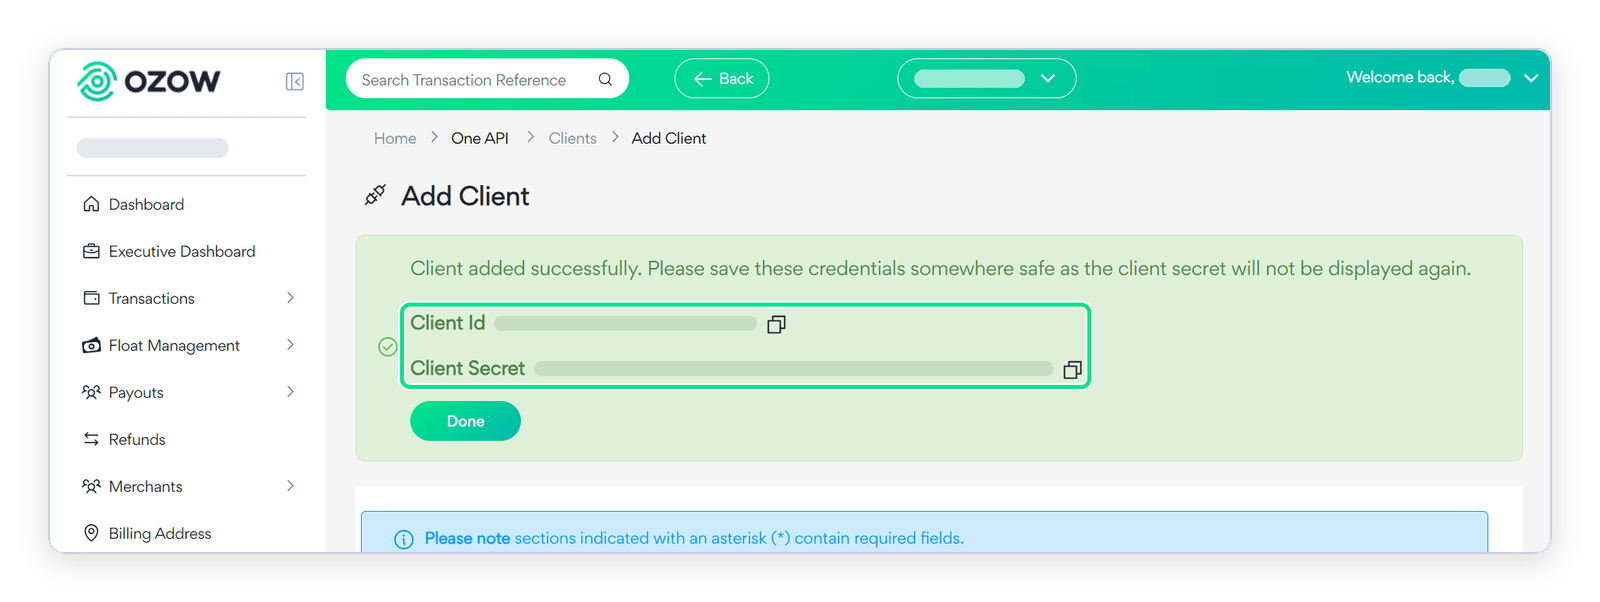
4. Copy and store your credentials: Your Client ID and Client Secret are shown. Use the copy icons to copy both, and store them somewhere secure, such as a password manager or secrets vault, before you click Done.
Important
Your client secret is only shown once and can't be retrieved later. If you lose it, disable the client and create a new one. Never share your client secret or put it in front-end code, apps or public code repositories.
Step 2: Obtain an access token
One API uses OAuth 2.0 Client Credentials authentication. You need an access token before making any API calls.
POST https://one.ozow.com/v1/token
Content-Type: application/x-www-form-urlencoded
curl -X POST "https://one.ozow.com/v1/token" \
-H "Content-Type: application/x-www-form-urlencoded" \
-d "client_id=YOUR_CLIENT_ID" \
-d "client_secret=YOUR_CLIENT_SECRET" \
-d "scope=payments" \
-d "grant_type=client_credentials"var client = new HttpClient();
var content = new FormUrlEncodedContent(
new[]
{
new KeyValuePair<string, string>("client_id", "YOUR_CLIENT_ID"),
new KeyValuePair<string, string>("client_secret", "YOUR_CLIENT_SECRET"),
new KeyValuePair<string, string>("scope", "payments"),
new KeyValuePair<string, string>("grant_type", "client_credentials"),
}
);
var response = await client.PostAsync("https://one.ozow.com/v1/token", content);
var result = await response.Content.ReadAsStringAsync();<?php
$curl = curl_init();
curl_setopt_array($curl, [
CURLOPT_URL => "https://one.ozow.com/v1/token",
CURLOPT_RETURNTRANSFER => true,
CURLOPT_POST => true,
CURLOPT_POSTFIELDS => http_build_query([
"client_id" => "YOUR_CLIENT_ID",
"client_secret" => "YOUR_CLIENT_SECRET",
"scope" => "payments",
"grant_type" => "client_credentials",
]),
CURLOPT_HTTPHEADER => ["Content-Type: application/x-www-form-urlencoded"],
]);
$response = curl_exec($curl);
curl_close($curl);
echo $response;
?>const response = await fetch("https://one.ozow.com/v1/token", {
method: "POST",
headers: { "Content-Type": "application/x-www-form-urlencoded" },
body: new URLSearchParams({
client_id: "YOUR_CLIENT_ID",
client_secret: "YOUR_CLIENT_SECRET",
scope: "payments",
grant_type: "client_credentials",
}),
});
const data = await response.json();import requests
response = requests.post(
"https://one.ozow.com/v1/token",
data={
"client_id": "YOUR_CLIENT_ID",
"client_secret": "YOUR_CLIENT_SECRET",
"scope": "payments",
"grant_type": "client_credentials",
},
)
data = response.json()Successful response
{
  "access_token": "mF_9.B5f-4.1JqM",
  "token_type": "Bearer",
  "expires_in": "14400",
  "scope": "payments"
}
Store the access_token and include it in the Authorization header of all subsequent requests:
Authorization: Bearer YOUR_ACCESS_TOKENTokens expire after the number of seconds in expires_in, which is 14400, four hours. Read
that field rather than hard coding the number: a change to the lifetime reaches you in the
response before it reaches this page. If authentication fails, the API returns
401 Unauthorized.
Step 3: Create a payment request
Create a payment request for your customer's order.
POST https://one.ozow.com/v1/payments
Authorization: Bearer YOUR_ACCESS_TOKEN
Content-Type: application/json
curl -X POST "https://one.ozow.com/v1/payments" \
-H "Authorization: Bearer YOUR_ACCESS_TOKEN" \
-H "Content-Type: application/json" \
-d '{
"siteCode": "YOUR_SITE_CODE",
"amount": {
"currency": "ZAR",
"value": 100.00
},
"merchantReference": "ORDER-001",
"beneficiaryReference": "ONLINESHOP002",
"expireAt": "2026-12-31T23:59:59Z",
"returnUrl": "https://yourstore.com/order-complete"
}'var client = new HttpClient();
client.DefaultRequestHeaders.Authorization = new AuthenticationHeaderValue(
"Bearer",
"YOUR_ACCESS_TOKEN"
);
var payload = new
{
siteCode = "YOUR_SITE_CODE",
amount = new { currency = "ZAR", value = 100.00 },
merchantReference = "ORDER-001",
beneficiaryReference = "ONLINESHOP002",
expireAt = "2026-12-31T23:59:59Z",
returnUrl = "https://yourstore.com/order-complete",
};
var response = await client.PostAsync(
"https://one.ozow.com/v1/payments",
new StringContent(JsonSerializer.Serialize(payload), Encoding.UTF8, "application/json")
);
var result = await response.Content.ReadAsStringAsync();<?php
$curl = curl_init();
curl_setopt_array($curl, [
CURLOPT_URL => "https://one.ozow.com/v1/payments",
CURLOPT_RETURNTRANSFER => true,
CURLOPT_POST => true,
CURLOPT_POSTFIELDS => json_encode([
"siteCode" => "YOUR_SITE_CODE",
"amount" => ["currency" => "ZAR", "value" => 100.00],
"merchantReference" => "ORDER-001",
"beneficiaryReference" => "ONLINESHOP002",
"expireAt" => "2026-12-31T23:59:59Z",
"returnUrl" => "https://yourstore.com/order-complete",
]),
CURLOPT_HTTPHEADER => [
"Authorization: Bearer YOUR_ACCESS_TOKEN",
"Content-Type: application/json",
],
]);
$response = curl_exec($curl);
curl_close($curl);
echo $response;
?>const response = await fetch("https://one.ozow.com/v1/payments", {
method: "POST",
headers: {
"Authorization": "Bearer YOUR_ACCESS_TOKEN",
"Content-Type": "application/json",
},
body: JSON.stringify({
siteCode: "YOUR_SITE_CODE",
amount: { currency: "ZAR", value: 100.00 },
merchantReference: "ORDER-001",
beneficiaryReference: "ONLINESHOP002",
expireAt: "2026-12-31T23:59:59Z",
returnUrl: "https://yourstore.com/order-complete",
}),
});
const data = await response.json();import requests
response = requests.post(
"https://one.ozow.com/v1/payments",
headers={
"Authorization": "Bearer YOUR_ACCESS_TOKEN",
"Content-Type": "application/json",
},
json={
"siteCode": "YOUR_SITE_CODE",
"amount": {"currency": "ZAR", "value": 100.00},
"merchantReference": "ORDER-001",
"beneficiaryReference": "ONLINESHOP002",
"expireAt": "2026-12-31T23:59:59Z",
"returnUrl": "https://yourstore.com/order-complete",
},
)
data = response.json()Key request fields
| Field | Type | Required | Description |
|---|---|---|---|
site |
string | Yes | Your Ozow site code |
amount. |
string | Yes | Must be ZAR |
amount. |
number | Yes | Payment amount |
merchant |
string | Yes | Your internal order reference |
beneficiary |
string | Usually | The reference that appears on your bank statement for the payment. Letters and numbers only |
expire |
string | Yes | Payment request expiry in RFC 3339RFC 3339 A profile of ISO 8601 for timestamps on the internet, and what most APIs mean when they say a field is an ISO date.IETF format |
return |
string | Yes | URL to redirectRedirect Sending the payer to the Ozow payment page to complete the payment, and returning them to your site afterwards. The alternative is embedding the checkout in your own page, where the payer never leaves it. the customer to after payment |
Important
Send beneficiaryReference. The contract marks it optional because a site can be
configured either way, but most are configured to require it. Leaving it out of a site that wants
it answers 400 with Error occurred creating merchant request (Parameter 'Bank reference missing'), which does not name the field it means.
For the full list of request fields see Create a payment.
Successful response
{
  "links": {
    "self": "https://one.ozow.com/v1/payments/497f6eca-6276-4993-bfeb-53cbbbba6f08",
    "cancel": "https://one.ozow.com/v1/payments/497f6eca-6276-4993-bfeb-53cbbbba6f08/cancel",
    "transactions": "https://one.ozow.com/v1/payments/497f6eca-6276-4993-bfeb-53cbbbba6f08/transactions"
  },
  "id": "497f6eca-6276-4993-bfeb-53cbbbba6f08",
  "status": "Created",
  "redirectUrl": "https://pay.ozow.com/497f6eca-6276-4993-bfeb-53cbbbba6f08/secure"
}
Step 4: Redirect the customer
Redirect your customer's browser to the redirectUrl from the response. Ozow displays the payment
page where the customer selects their preferred payment method and completes the payment.
Send them to the URL you were given, and do not build one. Its shape is Ozow's to change, and a URL assembled from the payment id is a URL that stops working without notice.
status on the response is Created. Compare it without case.
Once the customer completes or cancels the payment, Ozow redirects them back to your returnUrl.
Note
Pay by BankPay by Bank The payer authorises the payment inside their own banking app or online banking, and the funds move from their bank account. No card is involved and no card details are entered. is available by default. Additional payment methods such as Capitec PayCapitec Pay Capitec's own payment method. The payer gives a cellphone, account or ID number rather than card details, and approves the payment in the Capitec app, so no card number and no banking login is ever entered at checkout. It gets its own button rather than sitting inside the bank list, and it requires Customer Identity Verification.Capitec, Buy Now Pay Later, and PayShapPayShap South Africa's rapid payments service, run by the banks. Low-value payments clear in seconds, and the recipient can be identified by a ShapID instead of by an account number.payshap.co.za Requests are enabled by Ozow on request. Once activated, they appear automatically on the redirect page with no additional integration work required.
Important
Do not use the customer's return to your returnUrl as confirmation that a
payment was successful. Always confirm payment status via a verified webhook notification or an
API status check.
Step 5: Handle the webhook notification
Ozow sends a webhook notification to your endpoint when a transaction completes. One API uses Svix to deliver webhooks.
There are two ways to be told, and you choose them independently.
| Webhooks | notify |
|
|---|---|---|
| How you turn it on | The Ozow Portal or the webhook endpoints | Set notify on the payment request |
| What arrives | The events below, signed with Svix headers | The same notification the Payments API sends on a payinPayin A payment made by a consumer to a merchant. The direction most of this site is about: money coming in. Its counterpart is a payout, which sends money out and is not tied to any payment anyone made you., with the same payload and the same hash |
| When it fires | Every transaction | Every payment where you set notify |
Webhooks are the recommended path. notifyUrl is optional and exists so that an integration already
handling the Payments API notification keeps working:
point it at your existing handler and the payload and hash are the ones it already verifies.
Important
If you configure both, both fire for the same payment. Your handlers must be idempotentIdempotency A request is idempotent when sending it twice has the same effect as sending it once. It matters most where a retry after a timeout could otherwise take a payment twice.IETF draft, keyed on the merchant reference or the transaction ID, or one payment marks an order paid twice.
If you set neither, nothing is delivered and you must poll Get Transactions instead, which is slower and which Step 6 covers.
Setting up your webhook endpoint
Before you begin
you need an API client and an HTTPS endpoint on your server that can receive POST requests from Ozow. Make sure your endpoint returns a success response (HTTP 200) quickly, and can handle the same notification more than once. Ozow may resend notifications if your server doesn't respond.
Set up your webhook endpoint in one of two ways:
Option 1: Via the Ozow Portal
-
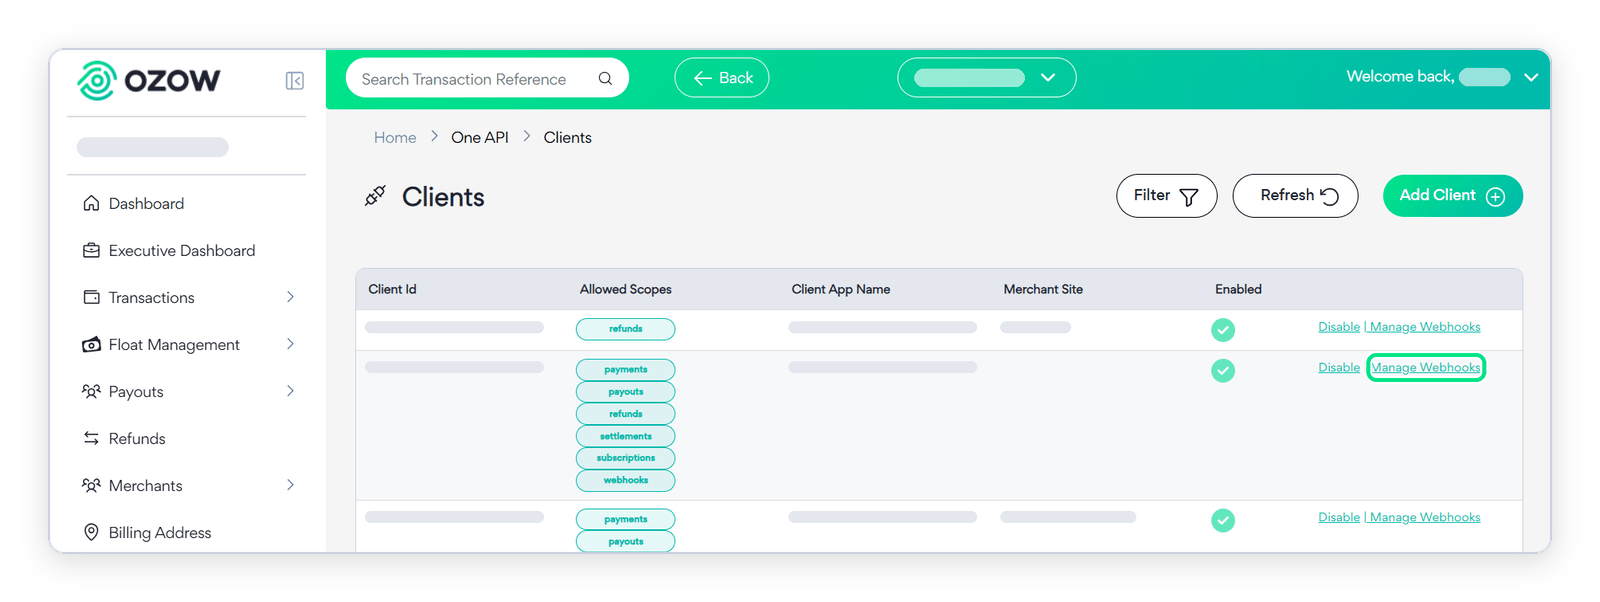
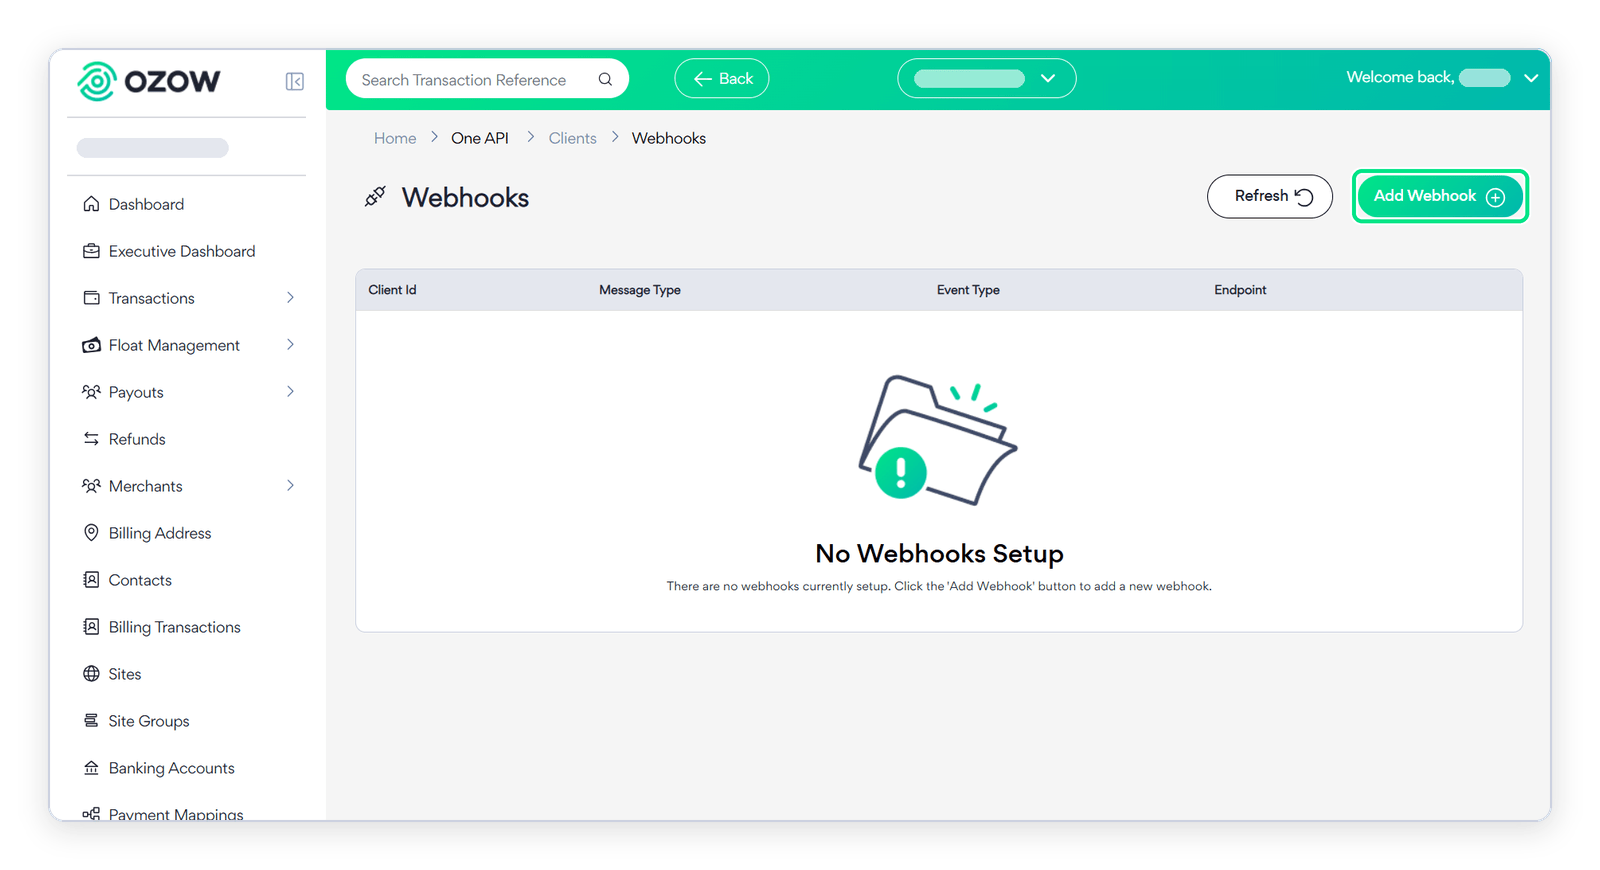
Open the client's webhooks: Go to One API > Clients. Find the client you want notifications for and click Manage Webhooks in its row.
-
Add a webhook: On the Webhooks page, click Add Webhook. If the client has no webhooks yet, you'll see "No Webhooks Setup".
-
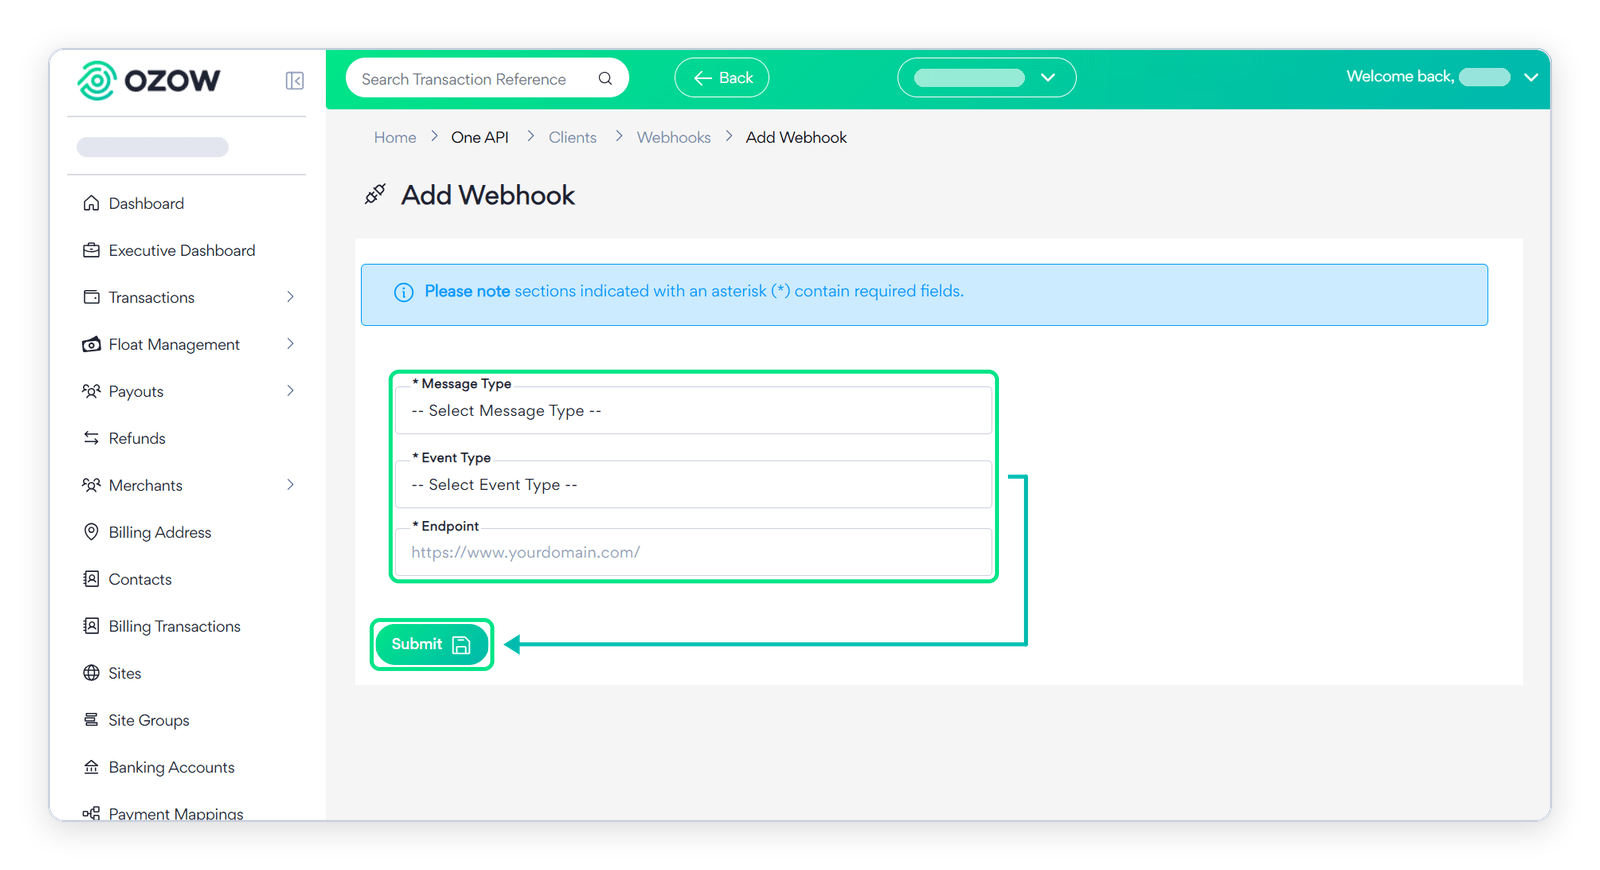
Enter the webhook details: Complete the form and click Submit.
- Message Type: how much detail each notification contains.
- Event Type: the event that triggers the notification.
- Endpoint: the HTTPS URL on your server that will receive the notifications.
-
Your new webhook appears in the list on the Webhooks page. Add a separate webhook for each event type you want to receive.
Option 2: Via the API: List Webhook Subscriptions to see what you already have, then Create Webhook Subscription for what you do not
Important
Creating a subscription that duplicates one you already have delivers every event twice, and the second delivery is indistinguishable from the first, so a handler that is not idempotent processes the same payment again. A deploy script that creates a subscription on every run is the usual way this happens.
Available webhook events
| Event | Description |
|---|---|
transaction. |
A transaction has completed: check the status field to determine if it was successful or resulted in an error |
refund. |
A refund has completed: check the status field for the refund result |
subscription. |
A customer approved a subscription consent ⚠️ Beta, subject to change |
subscription. |
A consent was not approved ⚠️ Beta, subject to change |
subscription. |
An individual collection succeeded ⚠️ Beta, subject to change |
subscription. |
An individual collection failed ⚠️ Beta, subject to change |
subscription. |
A subscription took all its scheduled occurrences ⚠️ Beta, subject to change |
subscription. |
A subscription was cancelled ⚠️ Beta, subject to change. One l, unlike Cancelled elsewhere |
subscription. |
An authorisation lapsed before the subscription became active ⚠️ Beta, subject to change |
Subscribe to the name exactly as written. An event name the service does not know is rejected, so a subscription to something close is a subscription that never fires.
Message types
When setting up your webhook subscription you can choose how much data is included in each notification:
| Message type | What it includes |
|---|---|
thin |
id, status and reason |
full |
The transaction's fields, in the same shape the Payments API notification uses |
Choose full if you need transaction details in the webhook payload. Choose thin if you only need
the status and will query the API for details separately.
Important
full is implemented for transaction.complete and refund.complete only. A
subscription event registered as full delivers nothing.
What arrives
Every delivery has the same envelope. data is
WebhookEventData when the subscription asked for thin,
TransactionCompleteFullData for a full
subscription to transaction.complete, and
RefundCompleteFullData for a full subscription
to refund.complete. Every value in a full payload is a string, the amount and the flags
included.
{
  "type": "transaction.complete",
  "timestamp": "2026-03-14T09:30:00Z",
  "data": {
    "id": "00000000-0000-0000-0000-000000000000",
    "status": "Successful",
    "reason": null
  }
}
id is the transaction, refund or subscription the event is about. reason carries the status
message and is null when there is nothing to say.
The status values for transaction.complete
These are not the transaction statuses on the statuses page: the webhook maps them down to four.
status |
Sent when the transaction is |
|---|---|
Successful |
Complete |
Incomplete |
Created |
Pending |
Pending or Pending |
Error |
anything else, including Cancelled, Abandoned, Voided and Unknown |
A cancelled payment arrives as Error, not as Cancelled. reason tells you which it was.
Switch on these four and read reason for the detail; do not expect the status names the
transaction itself carries.
For refund.complete, status is Pending, Failed, Complete, Submitted, Cancelled,
Returned or Invalid. Those are the thin values. A full subscription carries the refund's own
status in Status, unmapped, so PendingInvestigation and Error arrive as themselves rather than
as Pending and Failed. Handle both if you are on full.
Verifying the webhook signature
Every webhook notification includes Svix signature headers. You must verify the signature before acting on any notification.
| Header | Description |
|---|---|
svix-id |
Unique message identifier, the same if the webhook is resent after a failure |
svix-timestamp |
Timestamp in seconds since epoch |
svix-signature |
Base64Base64 A way of writing binary data using ordinary text characters, so it can travel inside JSON or a URL. It is an encoding, not encryption: anyone can decode it.Wikipedia encoded signature |
Verify a webhook signature has the five steps of the
check and a working verifier in csharp, php, python and javascript, with or
without the Svix library. To retrieve the secret for your webhook, use
Get Webhook Secret.
Important
Never process a webhook notification without first verifying its signature. Log and alert on verification failures: do not silently discard them.
Step 6: Confirm the transaction outcome
After verifying the webhook, check the transaction status and update your order.
You can also check transaction status directly via the API at any time:
GET https://one.ozow.com/v1/payments/{id}/transactions
Authorization: Bearer YOUR_ACCESS_TOKEN
Replace {id} with the payment ID returned in Step 2.
fromDate and toDate are required query parameters. See
Get Transactions for details.
See statuses for what each returned transaction status means.
Note
Handle duplicate webhook notifications idempotently. Ozow may send the same notification more than once. Processing the same notification twice must not result in double-crediting an order.
Step 7: Cancel a payment
If your customer abandons checkout or you need to cancel an order before the customer completes payment, you can cancel the payment request using the cancel link returned in the payment response.
POST https://one.ozow.com/v1/payments/{id}/cancel
Authorization: Bearer YOUR_ACCESS_TOKEN
A successfully cancelled payment will no longer be accessible to the customer via the redirectUrl.
If the customer attempts to use the link after cancellation they will see an error.
Important
You can only cancel a payment that has not yet been completed. Do not attempt to
cancel a payment with a complete status: use the refunds flow instead. See the
One API reference for details.
Optional features
Standalone button
A standalone button lets you surface a specific Ozow payment method as a dedicated button on your checkout page. Instead of showing a generic payment page where the customer selects their payment method, a standalone button takes the customer directly to a specific payment method; for example Capitec Pay, Buy Now Pay Later, or Crypto Payments.
Adding a standalone button to your checkout removes an extra step for the customer, increases awareness of specific payment methods, and can improve conversion rates.
Important
Do not display a standalone button for a payment method until you have received confirmation from Ozow that your account has been enabled for that payment method.
Digital wallets
Apple Pay and Google Pay cannot be offered as standalone buttons using this method. If you want to offer these as dedicated payment options at checkout, use the Embedded Wallet.
Implementation
Include the institutionId field in your payment request. When a valid institutionId is included,
the customer is taken directly to that payment method. The institutionId for each payment method
is available on the relevant Payment method identifiers page.
{
  "siteCode": "YOUR_SITE_CODE",
  "region": "ZA",
  "amount": {
    "currency": "ZAR",
    "value": 100.00
  },
  "merchantReference": "ORDER-001",
  "expireAt": "2026-12-31T23:59:59Z",
  "returnUrl": "https://yourstore.com/order-complete",
  "institutionId": "YOUR_INSTITUTION_ID"
}
Customer Identity Verification
If your business operates in a high-risk industry, you are required to implement Customer Identity VerificationCustomer Identity Verification Checking that the payment instrument belongs to the natural person making the payment. Ozow requires it for merchants it has classified as high-risk, on Pay by Bank, Absa Pay, Capitec Pay, Nedbank Direct EFT, FNB Payment Requests and PayShap Request, and can disable those methods where it is not implemented correctly. before going live with Bank API payment methods.
To implement it in One API, pass the payer.identity object in the payment request:
{
  "siteCode": "YOUR_SITE_CODE",
  "amount": { "currency": "ZAR", "value": 100.00 },
  "merchantReference": "ORDER-001",
  "expireAt": "2026-12-31T23:59:59Z",
  "returnUrl": "https://yourstore.com/order-complete",
  "payer": {
    "id": "CUSTOMER-123",
    "name": "Firstname Lastname",
    "identity": {
      "type": "said",
      "country": "ZA",
      "identifier": "0000000000000"
    }
  }
}
Identity fields
| Field | Type | Description |
|---|---|---|
payer. |
string | said for South African ID, passport for foreign passport |
payer. |
string | ISO 3166 Alpha-2ISO 3166-1 alpha-2 The two-letter country codes published by the International Organization for Standardization, such as ZA for South Africa and GB for the United Kingdom. Always uppercase.Wikipedia country code, ZA for South Africa |
payer. |
string | The verified ID or passport number |
For full details on Customer Identity Verification requirements see Customer Identity Verification.
Next steps
- Review the Building a secure integration checklist before going live
- Test your integration using Money in test cases
- Switch your base URL from staging to production when you are ready to go live
- See the One API reference for the full technical specification
In the API reference
11 entries
- POST
/tokenGenerate Authentication Token One API - POST
/paymentsRequest Payment One API - GET
/payments/{id}/transactionsList Transactions for Payment One API - POST
/payments/{id}/cancelCancel Payment Request One API - GET
/webhooksList Webhook Subscriptions One API - POST
/webhooksCreate Webhook Subscription One API - GET
/webhooks/{id}/secretGet Webhook Secret One API - POST Ozow sends your notification URLTransaction completed One API
- SchemaWebhookEnvelope One API
- SchemaWebhookEventData One API
- SchemaTransactionCompleteFullData One API
Last updated