
Payment requests
Create and send Ozow payment requests from the Dashboard, no code required.
On this page17 sections
- Before you start
- How to create a single payment request
- Step 1: Navigate to Payment Requests
- Step 2: Select single payment request
- Step 3: Fill in the payment details
- Step 4: Retrieve request details
- Step 5: Track the payment
- How to create bulk payment requests
- Step 1: Download the template
- Step 2: Complete the template
- Step 3: Upload the template
- Step 4: View bulk request results
- Message templates
- Creating a message template
- The Request Portal
- Tracking payment request status
- Support
Payment requests let you collect payments from customers without writing a single line of code. You create and send them directly from the Ozow Portal or Request Portal. Each one carries a link the customer opens to pay. Customers click the link, select their preferred payment method, and complete the payment; no integration required on your side.
Pay by BankPay by Bank The payer authorises the payment inside their own banking app or online banking, and the funds move from their bank account. No card is involved and no card details are entered. is enabled by default
on all payment requests. Any additional payment methods enabled by Ozow on your account will automatically appear on the payment page, no further action required on your side.
Before you start
- You need an active Ozow merchant account. If you don't have one, sign up at ozow.com/merchants
- Log in to your Ozow Portal at dash.ozow.com
- You need access to the Payment Requests section of the Dashboard. If you don't see it, contact support@ozow.com or your account manager
How to create a single payment request
Step 1: Navigate to Payment Requests
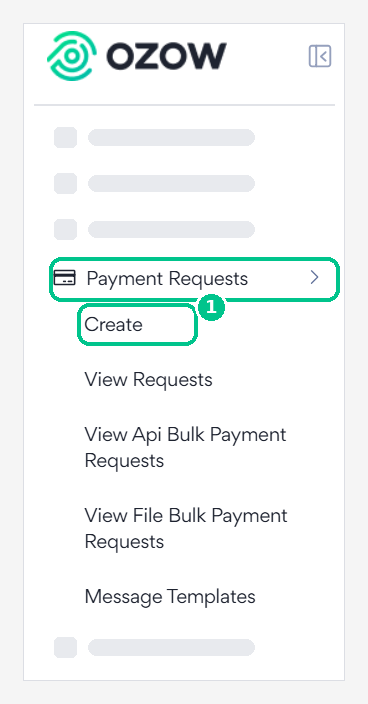
In the left-hand navigation menu of the Ozow Portal, scroll down to Payment Requests and click Create.
Step 2: Select single payment request
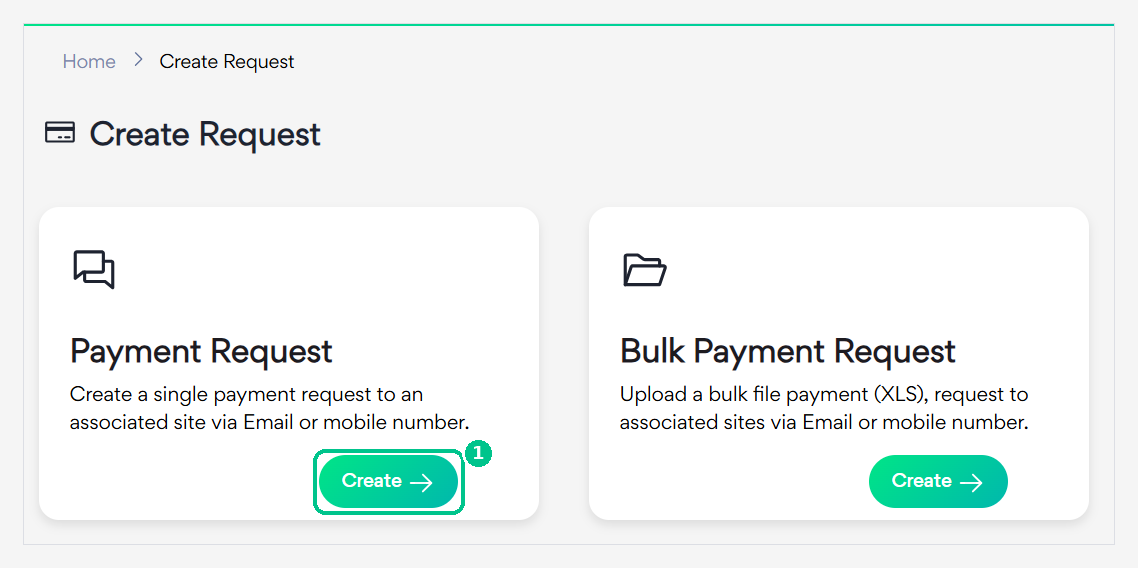
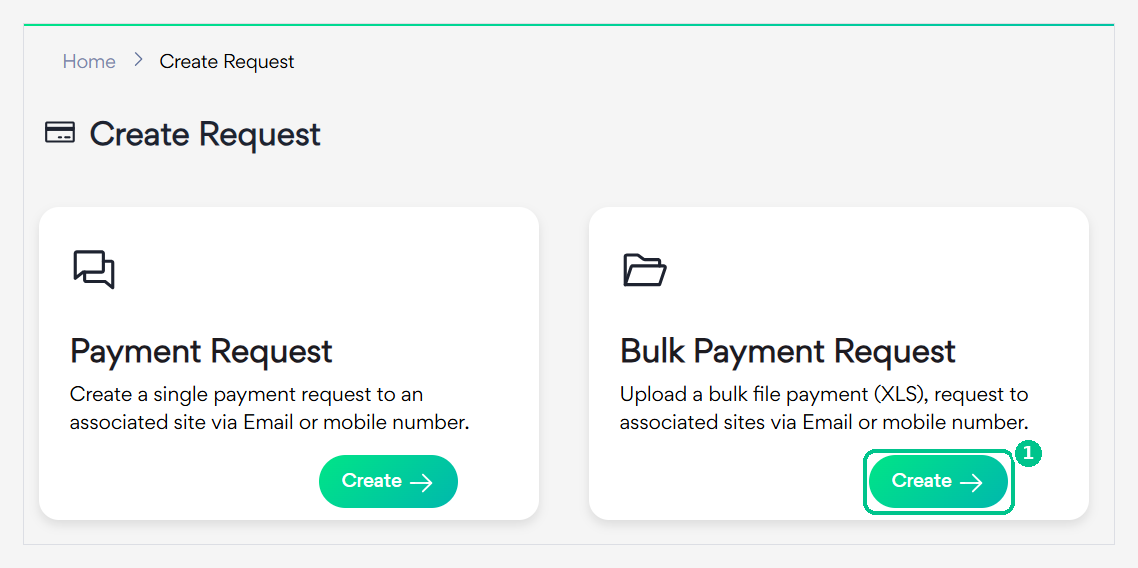
On the Payment Request card, click Create.
To send several requests at once from a spreadsheet, use Bulk Payment Request instead.
Step 3: Fill in the payment details
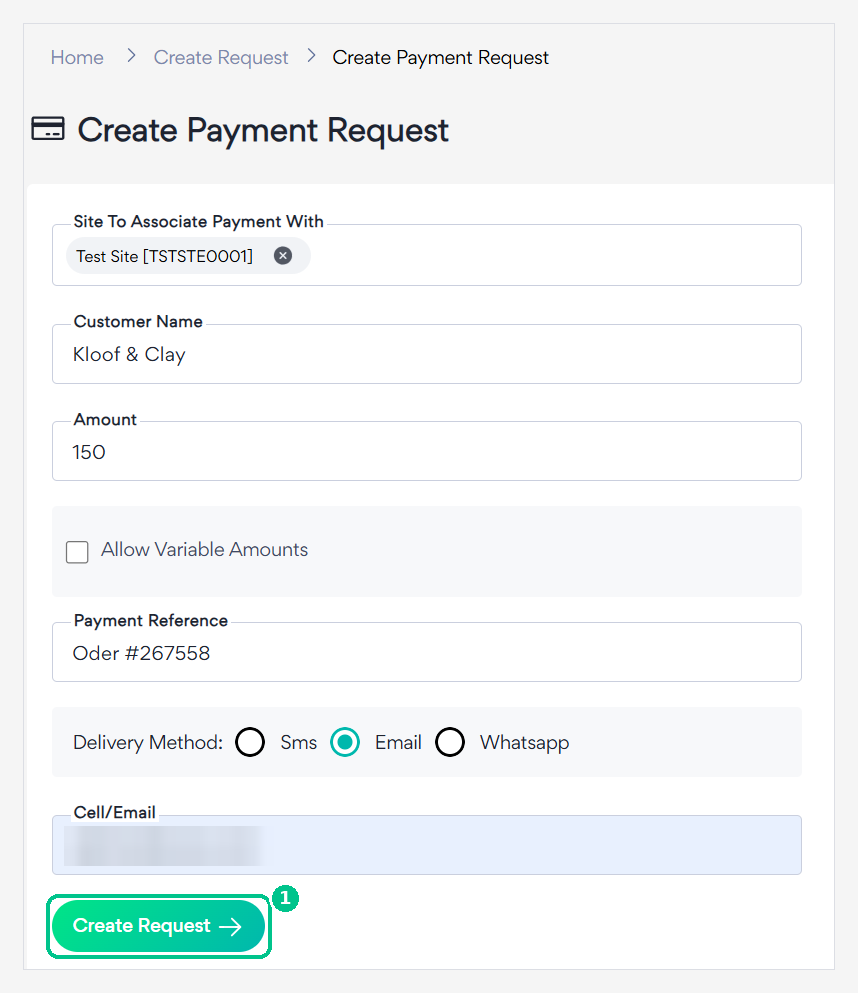
Complete the following fields and click Create Request:
| Field | What it means |
|---|---|
| Site | select the Ozow site you want to associate this payment with. If you have multiple sites, make sure you select the correct one. The list of your sites can be found under the Sites tab in the Dashboard. |
| Customer name | enter the name of the customer you are sending the payment link to. |
| Amount | Fixed amount: enter a specific amount. The customer will not be able to change it. Variable amount: the customer will be able to enter their own amount within a range defined by you. |
| Payment reference | enter a reference for your own reconciliation purposes, such as an invoice number. |
| Delivery method | select how you want to send the payment link to the customer: SMS, Email or WhatsApp. Note: WhatsApp is not enable by default. QR codes are only available via the Request Portal. |
Variable amount
is not enabled by default. Contact support@ozow.com to request variable amounts on your account.
QR codes
QR codes are only available via the Request Portal, not via the main Ozow Dashboard. See Request Portal below for details.
Step 4: Retrieve request details
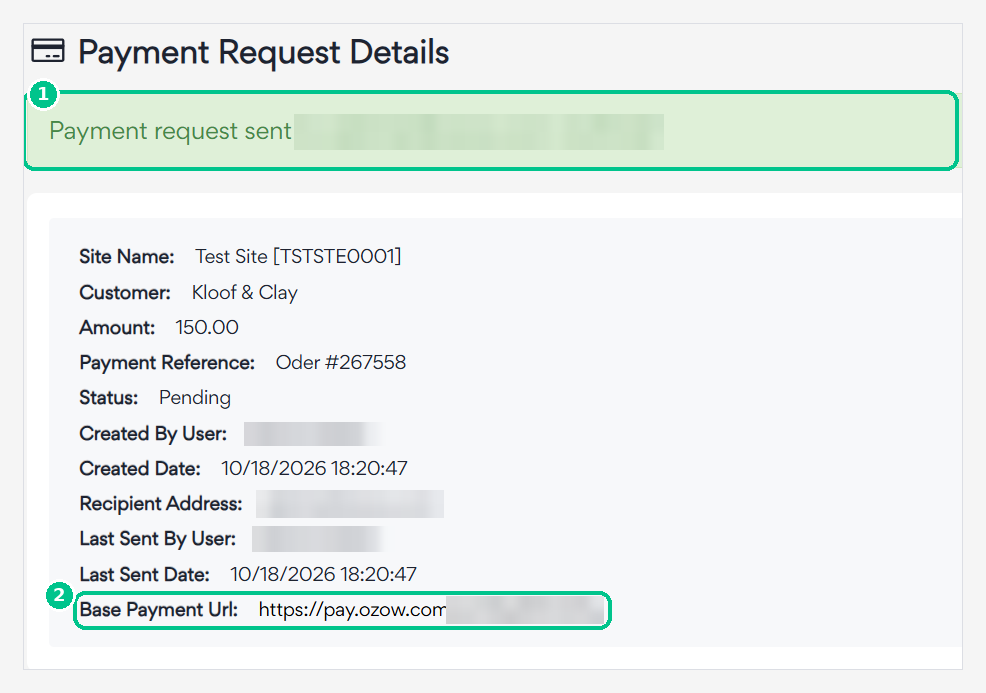
A green banner confirms that the request was sent and how it was delivered. Below it, you'll see:
- the request details
- its status, which starts as Pending
- the Payment Url, the link your customer uses to pay
Step 5: Track the payment
Once the request has been sent, you can track its status:
- Navigate to Payment Requests → View Requests to see all payment requests you have created, their status, and a direct copy of the payment URL
- Navigate to Transactions → View Transactions to see completed, pending, or cancelled payments
Note
A transaction is only created once the customer clicks on a payment method on the payment page. Simply opening the payment link does not create a transaction.
How to create bulk payment requests
If you need to send payment requests to multiple customers at once, you can upload them in bulk using an Excel template.
Step 1: Download the template
Navigate to Payment Requests → Create → Bulk Payment Request. Download the Excel template.
Step 2: Complete the template
Open the downloaded template and complete the required fields:
| Column | Field | Notes |
|---|---|---|
| A | Site codeSite code The unique code for a site registered under a merchant. A site is a place to transact: a website, or a branch of a store. A merchant can have several, and each transaction names the one it belongs to, so sending the wrong code files the payment against the wrong place. | Found under the Sites tab in the Dashboard. Format: XXX-XXX-XXX |
| B | Country code | Always ZA |
| C | Currency codeISO 4217 The three-letter currency codes, such as ZAR for the South African rand. Always uppercase.Wikipedia |
Always ZAR |
| D | Amount | Enter as a number with up to two decimal places |
| E | Transaction reference | Your reference for reconciliation. It appears on the customer's bank statement |
| F | Bank reference | The reference that appears on your bank statement for the payment |
| G | Is test | Always set to false, setting to true means the payment will not appear on the Dashboard |
| H | Allow variable amount | Set to true to allow variable amounts, requires Ozow approval |
| I | Variable amount min | Minimum amount if variable amounts are enabled |
| J | Variable amount max | Maximum amount if variable amounts are enabled |
| K | Recipient address | Email address or cell phone number of the customer |
| L | Correspondence type | Email, SMS, or Whats; QR code is only available via the Request Portal |
| M | Customer identifier | Only required for high-risk merchants: see Customer Identity Verification |
| N | Customer | Name or identifier of the person receiving the payment link |
| O | Expiry date UTC | Optional: set an expiry date for the payment request |
| P-T | Optional 1-5 | Optional custom fields for your own use |
| U | Cancel URL | Optional, URL to redirectRedirect Sending the payer to the Ozow payment page to complete the payment, and returning them to your site afterwards. The alternative is embedding the checkout in your own page, where the payer never leaves it. the customer to if they cancel |
| V | Error URL | Optional, URL to redirect the customer to if an error occurs |
| W | Success URL | Optional, URL to redirect the customer to on successful payment |
| X | Notify URL | Optional, URL to receive payment notifications |
Bank ID, account number, branch codeBranch code The six-digit number identifying a South African bank branch, the equivalent of a sort code or a routing number elsewhere. Each bank publishes one universal branch code that works for every account it holds, which is the one to use unless you have been given another., and account name columns
these fields are no longer supported. Leave them blank.
Is test field
this field is being deprecated. Always set it to false to ensure payments
appear on your Dashboard.
Step 3: Upload the template
Save the completed template and return to Payment Requests → Create → Bulk Payment Request → Upload your file.
- If there are errors, an error message will be returned and you will be able to see exactly which lines have errors
- Fix the errors and re-submit the corrected entries
- If there are no errors, the requests will be sent immediately
Step 4: View bulk request results
Navigate to Payment Requests → View File Bulk Payment Requests to see the status of your bulk uploads.
| Status | Meaning |
|---|---|
| Complete | All payment requests were sent successfully |
| Completed with errors | Some lines had errors, download the result file to see which lines failed |
| Error | A technical error occurred, redo the upload entirely |
If your upload returns Completed with errors, download the result file. You will see three additional columns:
- Payment link: populated if the payment link was sent successfully
- Errors: populated with the error reason if the line failed
- Sent UTC: the date and time the payment link was sent, if successful
Fix the lines with errors and resubmit them either as a new bulk upload or as individual single payment requests.
Message templates
You can customise the message that is sent to customers when a payment request is delivered via email, SMS, or WhatsApp.
Creating a message template
Navigate to Payment Requests → Message Templates → Add Message Template.
Email and SMS templates
Select Email and SMS as the template type. Choose your site, then customise:
- Your SMS message text
- Your email subject line
- Your email message body
Follow the instructions provided in the template fields. Email and SMS templates are generally approved immediately.
WhatsApp templates
Select WhatsApp as the template type. The recommended template type is Message with text header. You can also select Message with image header and upload a JPG of your logo.
WhatsApp approval
WhatsApp templates go through a review period of 24 to 48 hours before they are approved. Once approved, the template becomes the default used for all WhatsApp payment links.
Important notes on templates:
- If you do not create a template, Ozow's default template will be used
- Only one template per delivery method is supported, the approved template becomes the default
The Request Portal
The Request Portal is a simplified dashboard designed for payment collection teams who do not need access to the full Ozow merchant portal. It allows team members to create and send payment requests without seeing any merchant account information.
Key differences from the main Dashboard:
| Feature | Ozow Portal | Request Portal |
|---|---|---|
| Create payment requests | ✅ | ✅ |
| View payment request status | ✅ | ✅ |
| QR code delivery | ❌ | ✅ |
| View merchant account details | ✅ | ❌ |
| View transactions | ✅ | ❌ |
Getting access to the Request Portal
Contact support@ozow.com to request access for your team members. Ozow will add the relevant users and provide login credentials.
Creating a QR code via the Request Portal
- Log in to the Request Portal
- Create a payment request as normal
- Leave the delivery method and recipient fields empty
- Create the request, the QR code will be displayed immediately on the confirmation screen
- Download and save the QR code
Note
Any payment requests created via the Request Portal are also visible and trackable on the main Ozow Dashboard under Transactions.
Tracking payment request status
Payment request statuses can be tracked in two places:
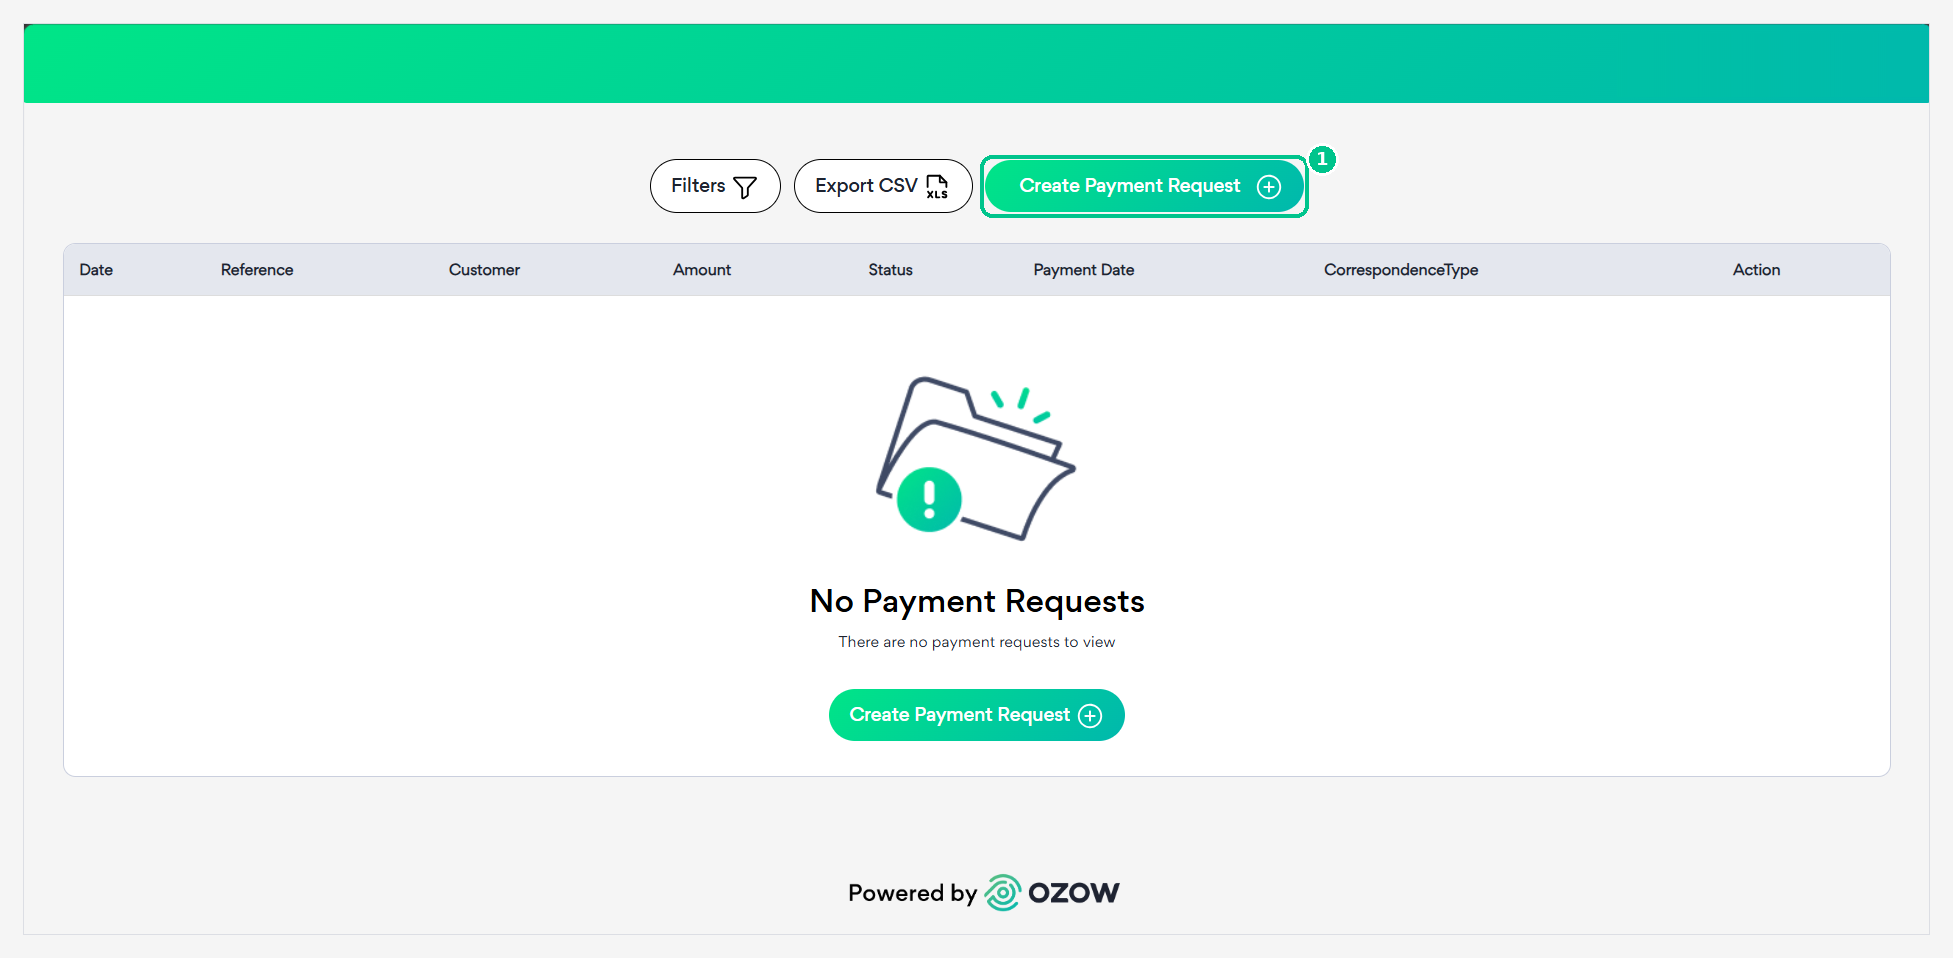
Payment Requests → View Requests: shows all individual payment requests created, including:
- Payment reference
- Customer name
- Amount
- Status (pending, complete, cancelled)
- Payment URL for easy copying
- Option to resend the link
Transactions → View Transactions: shows all transactions initiated from payment requests once a customer has clicked on a payment method.
Remember
A transaction is only created once the customer selects a payment method. Opening the link alone does not create a transaction.
Support
For assistance with payment requests contact support@ozow.com or reach out to your account manager.
Last updated